Tuesday, August 30, 2011

Winifred the Halloween Witch

I just posted another item to my etsy shop. It's a Halloween sign. I've posted a couple Halloween things already. I know it seems a little early to be doing so, but before you know it Halloween will be here, and i just didnt want be late in posting any Halloween decor like I usually am.
So here she is...
http://www.etsy.com/listing/80786329/wooden-trick-or-treat-halloween-witch


Wednesday, August 24, 2011

Milestones and Memories

I am the mother of three great kids and from the moment I found out I was carrying my first child nearly 14 years ago I have kept a journal for each one of them. It is a personal documentation, my own account of milestones and funny moments. I began these journals with the intentions of giving it to them one day when they had children of their own but I think I just might keep them instead and I’ll tell you why.

Every so often after completing an entry in their journals I like to browse through the pages and go back in time if only for a brief moment. A quick second when something triggers a memory in me and I can recall so vividly the smell in the air that  particular day, or the exact emotions that were going through me all because this little person, my child was in my life.
Being able to remember such memories in such a detailed way has sometimes made me cry. Not necessarily from sadness, but more at the fact that time truly does pass us by so quickly.  However having these journals to go back to and read has mostly made me literally laugh out loud a huge hardy laugh at all the funny things that my kids have said or done throughout the years, things that I have completely forgotten about.  And oh boy, kids really say AND do the darnedest things.

 I’ll of course share these memories with my kids and grandkids, but it will be something that I can look back to whenever I want. When they’re all grown up and living lives of their own and I’m no longer needed as often as I am now.

I so recommend that anyone with children keep such journals and take a minute or two every now and again to write in them. I promise you will be so happy that you did.

Monday, August 22, 2011

Happy Halloween Wooden Sign


I carved this Jack O Lantern myself on a wooden oval plaque. I painted it, crackled and distressed it to LOOK worn, and weathered. The Happy Halloween sign attached above is also made of wood.

This whimsical little sign hangs from a purple ribbon to match the inside of its mouth,eyes and nose. Hang it from a tree branch, or display it on your front door.

Absolutely ideal for the Halloween and fall season.       

Seaside Park

My family and I went to the beach this weekend. As usual it was beautiful and the weather was just perfect for splashing in the water, building sand castles, and laying out in the sun. I even managed to take a picture or two.


Here are a few of those pictures I took while there. Enjoy!


This little Seagull loved to be photographed. I have several of him.


Calming Waves

Ripples in the sand

Sandy toes

I can stare at this view for hours

I wonder whats inside this shell?

The sun was playing hide and seek

This is whats inside the shell!  I can't believe I got this close to it

Fall is in the air!

What a beautiful day here in Connecticut. I can smell and feel fall in the air. The fall is my absolute favorite time of year. The leaves change into warm beautiful colors like deep red, orange and brown.  It’s neither too hot nor too cold. Children and adults alike begin to anticipate Halloween.  Mother Nature is given a breath taking makeover and I am inspired by every last bit of it.

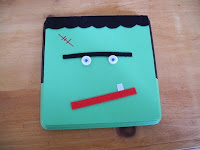
Frankie was the first fruit of my inspiration, and now I have a collection of Halloween decor that I started posting on my shop www.woodywoodworks.etsy.com

I am so excited about them. I so enjoyed making each one and I hope they receive positive feedback.

There were times I didn’t even want to sleep. I just wanted to work on them all night. BUT I know from experience that patience is key if you want your vision to come to fruition.  Hey that rhymes! LOL anyway please check out my shop and tell me what you think!

Tuesday, August 9, 2011

Frankenstein Halloween Decoration


All supplies can be found at Michaels:

  • wooden square plaque (6"x6")
  • sand paper
  • 2 sponge brushes
  • size 0 liner brush
  • size 6 shader brush
  • light green, black, and red acrylic paint
  • Gloss Mod Podge
  • black, red, white stiff felt
  • big googly eyes
  • 2 screws (3/4" long)
  • frame hook


Step 1: The first thing you’re going to want to do is lightly sand the wooden square plaque on all sides. You’re going to do this because you will end up with a much smoother surface once your project is completely finished, and so that you do not get any splinters while working on it. Don’t forget to dust off any loose particles before you begin painting.


Step 2: With the sponge brush you’re going to apply the MEADOW GREEN acrylic paint on the raised flat side of the wooden square and you’re also going to want to paint half of each side of the wooden square (left, right) and also the entire bottom part. Let this dry completely (about 20 minutes) before you begin step 3.


Step 3: With the size 6 shader paint brush (flat/wide tip) paint the left, right and top half of Frankenstein’s head in BLACK. When that dries up, turn the wooden square over to the side that is still unfinished and paint the back of his head entirely in black.

Step 4: Once the black paint has completely dried, you will cover the entire wooden square with Mod Podge GLOSS. Mod Podge does dry clear.


Step 5: Take your stiff black felt and Cut a 2inch strip with a wavy pattern on one side. Spread some E6000 glue on one side with your finger and place it on the top of his head

Step 6: Use your red paint to draw the stitches on the upper left hand corner of Frankie’s face

Step 7: Place his googly eyes by dabbing on a little E6000 glue on the back of them and placing them on his face 

Step 8: cut a thin strip of the black felt for his eye brows, spread a little E6000 glue on the back and place it over his eyes.


Step 9: Cut a strip of red felt for the mouth


Step 10: cut a small square for the tooth with the white felt and then attach the screws on each side


Step 11: Turn Frankie over and attach the frame hook to the back of his head and voile, you’re done! That wasn’t so hard was it? Now go ahead and hang him up!